Sometime ago I posted a blog about achieve fault tolerant messaging, in the article I mention using the fabric registry discovery to hide all the IP address and port detail in the client side. With new Fuse 6.2 you will not be able to find this anymore. So how do we achieve fault tolerant messaging in the new Fuse?
In JBoss Fuse 6.2, we can do it by starting up a MQ Gateway. What it does is it provides a single IP and port to accept connections from clients. All the individual IPs and Port of the broker are hidden away tothe client, the client only needs to know the IP and port of the MQ Gateway (Default Port: 61616). The gateway will discover all the brokers in the fabric, and no matter what the incoming protocol is, it can be OpenWire, MQTT, STOMP and AMQP. The gateway will see which broker is available in the host specified for the protocol, and connect the client to the broker. If multiple brokers are available in the host group, gateway can dispatch request to them, by this we can achieve load balance. There are 3 different way to do load balance, Random, Round Robin and Sticky.
If any thing goes wrong with the broker a client is connecting, and got disconnected, the gateway will look for another available broker in the group. This gives you high availability to your service.
To startup a MQ Gateway, simply choose the gateway-mq profile to the container.
It will automatically find brokers in fabric,
I updated my failover demo instead of using fabric registry discovery, I change my application and connect it to MQ Gateway. In this demo, you will first need to create a broker failoverMS, choose Master/Slave type and use blogdemo as Group.
Click on the red triangle to start provision the brokers. It will take you yo the page to create container for the broker profile.
And will start create number of container you specified in the configuration.
Then we can startup the MQ-Gateway, before we do that, go to the gateway-mq profile and edit the io.fabric8.gateway.detecting.properties file. Change port to 8888 and defaultVirtualHost to blogdemo.
And add the gateway-mq profile to a container, as previously stated.
Let's take a look at the client application, it's written with Camel. Look at the configurations in the Camel route, here you see no matter if it's an OpenWire or MQTT protocol, it is set to tcp://localhost:8888, which is the IP and port of MQ Gateway.
This application send a message to the broker, through OpenWire and MQTT protocol every 5 secs. Deploy the profile "" to a new container.
Go to container console of testcon, you will find the camel routes are running
In the MQ Gateway, you can see the request was dispatched to the broker we have created.
Are you looking for a business loan, personal loans, mortgage loans, car loans, student loans, unsecured consolidation loans,project funding etc ... Or simply refuse loan from a bank or financial institution for one or more reasons? We are the right solutions for credit! We offer loans to businesses and individuals with low and affordable interest rate of 2%. So if you are Interested in an urgent and secured loan. For more information kindly email us today Via: elegantloanfirm@hotmail.com.
Last article I talked about the study I did among Red Hat customers that makes the jump towards deploying their workloads on hybrid and multi-cloud environments. These articles are abstractions of the common generic components summarized according to the actual implementations.
To overcome the common obstacles of going hybrid and multi-cloud, such as finding talents with multi-cloud knowledge. Secure and protect across low trust networks or just day to day operation across the board. I have identify some solutions from the study, where I will be covering in the serie of articles:
One of the keys to manage multiple clusters is observability. In a single cluster environment, metrics and logs are segregated in different layers, application, cluster components and nodes, now adding in the complexity of multiple clusters on different clouds will definitely make it more chaotic than ever. By customizing how to gather and view the metrics allows you to be more effective, easier to operate, pinpoint and locate problems quickly. To do that, we will need to decide how we want to aggregate the collected data, by regions, operations or a centralized point. (Depends on your HA strategy and how much data you are collecting). And then decide how to scrape or collect the metrics and logs. Historical data are valuable not only for us to view and identify problems. Since many vendors now support AI based remediation, by validating and extracting the data for operational models. Therefore we will also need to persist data.
How it works,
Checkout my previous article on the setup of the hybrid and multi cloud environment, and if you are interested, other articles on GitOps and secure dynamic infrastructure. But this time, let’s look at how observability works. First to view things in a single pane of glass, we host Grafana dashboard to stream and query the Observatorium service in all managed clusters.
When bootstrapping the managed clusters on each cloud, we will need to install the following,
For Monitoring,
Prometheus is installed to scrape metrics for cluster components, as well as the applications. A Thanos sidecar gets deployed along with a Prometheus instance to persist metrics to storage and allow instant query to Prometheus data. You may have multiple Prometheus instance per cluster depends on how you want to distribute the workload.
Observatorium is installed based on your defined strategy for observability(in this case, per region), this will deploy a set of service instances on the cluster. Where they will be responsible for aggregating, storing input metrics, as well as efficiently storing the data. Also providing endpoints(API) for observation tools like Grafana to query the persisted data.
Queries from the Grafana dashboard in Hub cluster, the central Querier component in Observatorium process the PromQL queries and aggregate the results.
Prometheus scraps metrics in the local cluster, Thano sidecar pushes metrics to Observatorium to persist in storage.
Thanos sidecar acts as a proxy that serves Prometheus’s local data over Thanos’s gRPC API from the Querier.
For Logging,
Promtail collects log files with fine-grained control of what to ingest, what to drop, and the final metadata to attach to the log line. Similar to Prometheus, multiple Promtail instances can be installed per cluster depending on how you want to distribute the logging workload.
Observatorium in each defined region are also configured with Grafana Loki, where it aggregates logs by labeling each log stream pushed from Promtail. Not only it persist logs in stooges but also allow you to query the high cardinality data for better analysis and visualization.
Promtail is used to collect log and push to Loki API (Observatorium)
In Observatorium, Loki distributor sends logs in batches to ingester, where they will be persisted. Couple of things to beware both ingester and querier requires large memory consumption, will need more replicas
Grafana dashboard in Hub cluster display logs via requesting
Real time display(tail) with websocket
Time-series base query with HTTP
This summarizes how observability was implemented in our customer’s hybrid multi-cloud environment. If you want to dive deeper into the technology, check out a video done by Ales Nosek.
Hybrid multi cloud can be a difficult, this is my study of a real customer use case on their journey using GitOps, multi cluster management system and securing dynamic infrastructure secrets.
Quick recap,
Last article I talked about the study I did among Red Hat customers that makes the jump towards deploying their workloads on hybrid and multi-cloud environments. These articles are abstractions of the common generic components summarized according to the actual implementations.
To overcome the common obstacles of going hybrid and multi-cloud, such as finding talents with multi-cloud knowledge. Secure and protect across low trust networks or just day to day operation across the board. I have identify some solutions from the study, where I will be covering in the serie of articles:
Infrastructure as code (IaC) allows the infrastructure to be more visible among teams through sharable files and scripts that contain how environments are set up and configured. We can also automate to speed up the provisioning and deployment process and avoid manual misconfiguration. GitOps takes it a step further, better managing the setting and configuration files into a versioned, centralized repository as the single source of truth. This allows better collaboration. At the same time, applying pipeline along with status check and testing, is perfect for introducing the continuous integration and continuous delivery (CI/CD) practice. This eliminates configuration drift, by constantly checking if the end environment is in-sync with the desired state defined in the repository.
How it works,
First, we start with getting the management hub ready. (for more information, see my previous post.) In short, in the management hub, we will have Red Hat Advanced Cluster Management for Kubernetes (RHACM) installed. Where it is used for provisioning/patching/updating the OpenShift/Kubernetes clusters (This is the key to hybrid and multi cloud environments). On top of RHACM, OpenShift GitOps is also installed for declarative continuous delivery, where it watches the manifests in repositories and automatically(or manually after configuration) updates deployments to the desired state.
Here is the flow of infrastructure continuous delivery on hybrid and multi cloud:
Manifest and configuration are set as code template in the form of “Kustomization” yaml. It describes the end desire state of how the managed cluster is going to be like. When done, it is pushed into the source control management repository with version assigned to each update.
OpenShift GitOps watches the repository and detects changes in the repository.
OpenShift GitOps creates/updates the manifest by creating Kuberenet objects on top of RHACM.
ACM provision/update/delete managed clusters and configuration according to the manifest. In the manifest, you can configure what cloud provider the cluster will be on, the name of the cluster, infra node details and worker node. Governance policy can also be applied as well as provision an agent in the cluster as the bridge between the control center and the managed cluster. Here are some snippets of how we can describe the end state in the managed cluster.
OpenShift GitOps will continuously watch between the code repository and status of the clusters reported back to RHACM. Any configuration drift or in case of any failure, it will automatically try to remediate by applying the manifest (Or showing alerts for manual intervention).
For application or updating during the continuous delivery, the process is very similar:
Developers have continuous integration pipelines to build application binary and images. Any changes to the infrastructure will also be pushed to the source control management repository.
OpenShift GitOps watches the repository and detects changes in the repository.
OpenShift GitOps create/update kustomize resources directly on to the managed clusters via the control plane
Change locally in the managed cluster.
This concludes my study on the overall architecture of how GitOps works in Hybrid Multi-cloud environments. If you want to dive deeper into the technology, check out Ales Nosek’s youtube video, where in his video he will take you through step by step on how to do GitOps to manage your clusters.
Hybrid multi cloud can be a difficult, this is my study of a real customer use case on their journey using GitOps, multi cluster management system and securing dynamic infrastructure secrets.
Quick recap,
In my series of articles I went over the study I did among Red Hat customers that makes the jump towards deploying their workloads on hybrid and multi-cloud environments. These articles are abstractions of the common generic components summarized according to the actual implementations.
To overcome the common obstacles of going hybrid and multi-cloud, such as finding talents with multi-cloud knowledge. Secure and protect across low trust networks or just day to day operation across the board. I have identify some solutions from the study, where I will be covering in the serie of articles:
Kubernetes offers it’s own secret management control, although it’s sufficient for running a single cluster, but when you are trying to manage multiple sets of credentials and secure configurations, especially with the introduction of automated process and continuous delivery practice. We need a better way to securely and centrally manage these data.
How it works,
Checkout my previous article on the setup of the hybrid and multi cloud environment, and if you are interested, another article on getting the GitOps works. But for now, we are going to assume we have a fleet of clusters deployed on top of multiple cloud vendors, and one in the local data center. All the infrastructure is set as code and stored in a source management system. Where our GitOps system constantly coverage the managed clusters with its desired state. In order to setup a secure way to manage credentials and configuration cross clusters, we need two components,
External Secret management in OpenShift/Kubernetes
Enable use of external secret management systems (like HashiCorp Vault in this case) to securely add secrets into the OpenShift platform.
Hashicorp Vault
Secure centralized store for dynamic infrastructure and application across clusters. For low trust networks between clouds and data centers.
This is how the two components work together to manage secret in dynamic infrastructure:
During setup, the token to securely access HashiCorp Vault is stored in Ansible Vault. It is encrypted to protect sensitive content.
Red Hat Advanced Cluster Management for Kubernetes (RHACM) allows us to have centralized control over the managing clusters. It acquires the token from Ansible Vault during install and distributes among the clusters.
To allow the cluster access to the external vault, we need to set up the external secret management. OpenShift Gitops is used to deploy the external secret object to a managed cluster.
External secret management fetches secrets from HashiCorp Vault using the token we created in step 2. And constantly watch for updates.
Secrets are created in each namespace, where applications can use.
This is how to manage dynamic infrastructure secret in a multi cluster and cloud environment.
Hybrid multi cloud can be a difficult, this is my study of a real customer use case on their journey using GitOps, multi cluster management system and securing dynamic infrastructure secrets.
The Intro,
More companies are strategizing to be on Hybrid cloud or even Multi-cloud, for higher flexibility, resiliency and sometimes, simply it’s too risky to put the egg in the same basket. This is a study based on real solutions using Red Hat’s open source technology. This article is an abstraction of the common generic components summarized according to the implementation. And give you an overall idea of the flow and why we choose certain technologies to set you off the right place to begin your own journey on Hybrid Multi-cloud environments. The idea of distributed computing is not new, by leveraging the combined processing power, memory and storage of multiple software components on multiple machine instances to achieve better performance. The problem now is how can we scale out the deployment for these software components quickly among the clouds with stability of actual machines. Having the freedom to bring up clusters close to the clients issuing the request and close to the data stores due to data gravity. Or sometimes they want to deploy a section of the application supporting the cognitive services they were running on the specific cloud providers.
To host platforms on multiple clouds can be difficult, as it introduces extra complexity. No matter if it’s finding the people with knowledge on all cloud vendors, securing across clouds and governance across the board. We found the most common questions from customers are, automation, security and uniformity. I have broken down how this study tackles above concerns using Red Hat and it’s partner’s technologies into four sections:
We have logically separated it into three main areas,
Unified management Hub, which hosts the management platform to manage all custers, a vault securing and issuing infrastructure credentials, a repository that stores the infrastructure code. And a CI/CD controller which continuously monitors and applies updates. I found many customers decided to host the hub in their own data center on top of their existing virtualization infrastructure.
Managed clusters, these are the clusters that run the customer’s application, scaling up/down for distributed computing needs. Metrics and status are constantly synchronized back to the unified management hub. These clusters are deployed across major cloud vendors such as Azure, AWS and Google cloud.
Bootstrap automation, this is a temporary instance that is used for bootstrapping the unified management hub. It consists of multiple Ansible playbooks to install all the components on the hub, and also setup assigned the administrative roles.
The Technology Stack,
In the case study, customers have chosen several the following technologies and the reason why:
Red Hat OpenShift Platform
Instead of directly using and learning the offering from all vendors, or even learning the subtle differences between the Kubernetes offering, using a platform offering sits on top across data centers, private and public cloud will provide an unified way to deploy, monitor and automate all the clusters.
OpenShift GitOps
Automate delivery through DevOps practices across multicluster OpenShift and Kubernetes infrastructure, with the choice of either automatically or manually synchronizing the deployment of clusters according to what’s in the repository.
Core Monitoring
OpenShift has a pre-configured, pre-installed, and self-updating monitoring stack that provides monitoring for core platform components. On top of that, we can also define monitoring for user-defined projects as well.
Grafana Loki
Horizontally-scalable and better log aggregation system, and more cost effective and easy to operate especially in a multi-cluster environment.
External Secret
Enable use of external secret management systems (like HashiCorp Vault in this case) to securely add secrets into the OpenShift platform.
Red Hat Advanced Cluster Management for Kubernetes
Controls clusters and applications from a single unified management hub console , with built-in security policies, provisioning cluster and application lifecycles. Especially important when it comes to managing on top of multi-clouds.
Red Hat Ansible Automation
Used for automate configuration and installation of the management hub.
Hashicorp Vault
Secure centralized store for dynamic infrastructure and application across clusters. For low trust networks between clouds and data centers.
The Setup,
The key to automate is “Infrastructure as code”, by versioning and storing clusters, networks, servers, data stores or even applications as software into a centralized and controlled repository, it allows the environment to be agile, consistent and less error prone. As the creation, updates are all pre-configured, and can be applied by simply executing the code, with less human errors and can be replicated across different environments.
We will start by bootstrapping the management hub. Here are the steps
First, we need to setup the Red Hat OpenShift Platform (OpenShift) that hosts the Management Hub. By using the OpenShift installation program, it provides flexible ways to get OpenShift installed. Ansible playbook used to kick off the installation with configurations.
Ansible playbooks are again used to deploy and configure Red Hat Advanced Cluster Management for Kubernetes (RHACM) and later other supporting components (External secret management) on top of the provisioned OpenShift cluster.
Install Vault with Ansible playbook. The vault we choose is from our partner Hashicorp, the vault is to manage secrets for all the Openshift clusters.
Ansible playbook is used again to configure and trigger the Openshift Gitops operator on the hub cluster. And deploy the Openshift Gitops instance for continuous delivery.
For identity management, we use the existing one and use it as a source for openshift groups. And later use it to authenticate users when logging into the Hub and managed clusters.
Now we have the centralized unified management hub ready to go, we are now ready to deploy the cluster on multi cloud to serve the developers and end users. In my next article, I will go over my study on GitOps. And simplify provisioning or updating in the complex setting.
Recently I had an opportunity to work with Sanket Taur (IBM UK) and his team on a demo, showcasing how Red Hat products can help speed up innovation with SAP Landscapes. To be honest I was shocked at how little time we were given to create the entire demo from scratch. It’s less than a week. While still doing our day job, having a couple of hours per day to work on it. If this doesn’t convince you.. I don’t know any other stronger proof than this, to show how agile and fast a cloud solution can be from development to production.
I encourage you to attend Sanket’s session for more details, this blog is JUST my view on the demo, and things I did to make it running. The demo was a simple approval process of Sales Orders. The SOs are created in the Core SAP platform (In this case ES5), therefore we need to create an application that speaks to the Core SAP platform and retrieve all the data needed.
First thing first, we need a Kubernetes(k8s) platform. And then I used Camel K — an enhanced framework based on Camel (part of Red Hat Integration product) to create the application. There was some mixup during the setup, instead of the OData v4 endpoint from ES5 for SO, line items and customer details. I was given an OData v2 endpoint. (Needless to say, how more efficient the OData v4 is, compared to v2. Please do update it when you have a chance). Note that Camel K only supports OData v4. HOWEVER, we can still get the results using normal REST API calls (So you are still covered).
This is how Camel helps you retrieve all the information needed. As you can see I have made several requests to get all the data needed as well as doing some transformation to extract results to return.
The endpoints to trigger the call to SAP, is exposed as an API. Here I use Apicurio Studio to define the API contract. With two endpoints, fetch and fetchall. One returns SO, PO and Customer data, where the other one returns a collection of them.
We can now export the definition as a OpenAPI Specification contract in the form of YAML (Link to see the yaml). Save the file into the folder of where your Camel application is. Add the API yaml file name to your Camel K application mode line, and Camel K will automatically map your code to this contract.
By using the Camel K CLI tool. Run the command to deploy the code to the OpenShift platform.
kamel run SapOdata.java
And you should now see a microservice running. Did you notice how Camel K helps you, not only it detects and loads the libraries needed for you, but also containerised it as a running instance.
Go to my git repo to see the full code and running instructions.
Kafka was used in the middle to set the event driven architecture. So the SO approval application can notify the shopping cart client when it’s been approved.
Since everything was put together in a week, with everyone in different timezones, miss communication will happen. What I did not realize was that all the client applications, SO approval and shopping carts were all written in JavaScript, and must communicate via HTTP. But Kafka only does Kafka protocols!!! Therefore, I set up an Http Bridge in front of the Kafka clusters, so it will now translate the Kafka protocols.
And now clients can access the topic via HTTP endpoints. For more information on how to set, go to my Github repo for more detailed instructions.
Last but not least, we need to migrate all UI5 SAP web applications to OpenShift. The UI5 is basically an NODEJS app. We first create the docker file to containerize it. And push it to a container registry.
BUT WAIT!! Since UI5 only does binds to *localhost* (weird..), we need to add a proxy that can tunnel traffic to it. Therefore, I added a sidecar proxy running right next to the NodeJS application. By adding the following configuration.
This will start the proxy, and since this NGINX proxy starts on port 8081, make sure you update all related settings on OpenShift.
  oc expose dc socreate --port=8181
  oc expose svc socreate
And this is how you would migrate the UI5 application from a local SAP instance onto OpenShift. More detailed migration instructions, check out my Github repo.
Once it’s done, you can see all the applications are running as a container on the cloud. And ready to approve the SOs.
This is actual developer view on top of our demo OpenShift platform
Thank you Sanket for this fun ride, all the nail biting moments, but this is all the fun in IT right? We work through problems, tackle issues and ultimately get everything done! 🙂 If you are a SAPer, and want to join the container world of cloud, what are you still waiting for? Join the ride! This is the story on how we made SAP Cloud Native and Event Driven in 4 days.
To see the full version, be sure to attend Sanket’s session:
SAP & OpenShift: From classic ABAP development to cloud native applications: Use cases and reference architecture to implement with SAP Landscapes to unlock innovation enabled by Hybrid Cloud and Red Hat OpenShift.
You want Kafka to stream and process the data. But what comes after you set up the platform, planned the partitioning strategy, storage options, and configured the data durability? Yes! How to stream data in and out of the platform. And this is exactly what I want to discuss today.
The Background
Before we go any further, let’s see what Kafka did to make itself blazing fast? Kafka is optimized for writing the stream data in binary format, that basically logs everything directly to the file system (Sequential I/O) and makes minimum effort to process what's in the data (Optimize for Zero Copy). Kafka is super-charged at making sure data is stored as quickly as possible, and quickly replicating for a large number of consumers. But terrible at communication, the client that pushes content needs to SPEAK Kafka.
Here we are, having a super fast logging and distributing platform, but dumb at connecting to other data sources. So who is going to validate the data sent in/out of the kafka topic? What if I need to transform the data content? Can I filter the content partially? You guessed it. The clients. We now need smart clients that do most of the content processing and speak Kafka at the same time.
What are the most used connect tools today for Kafka users?
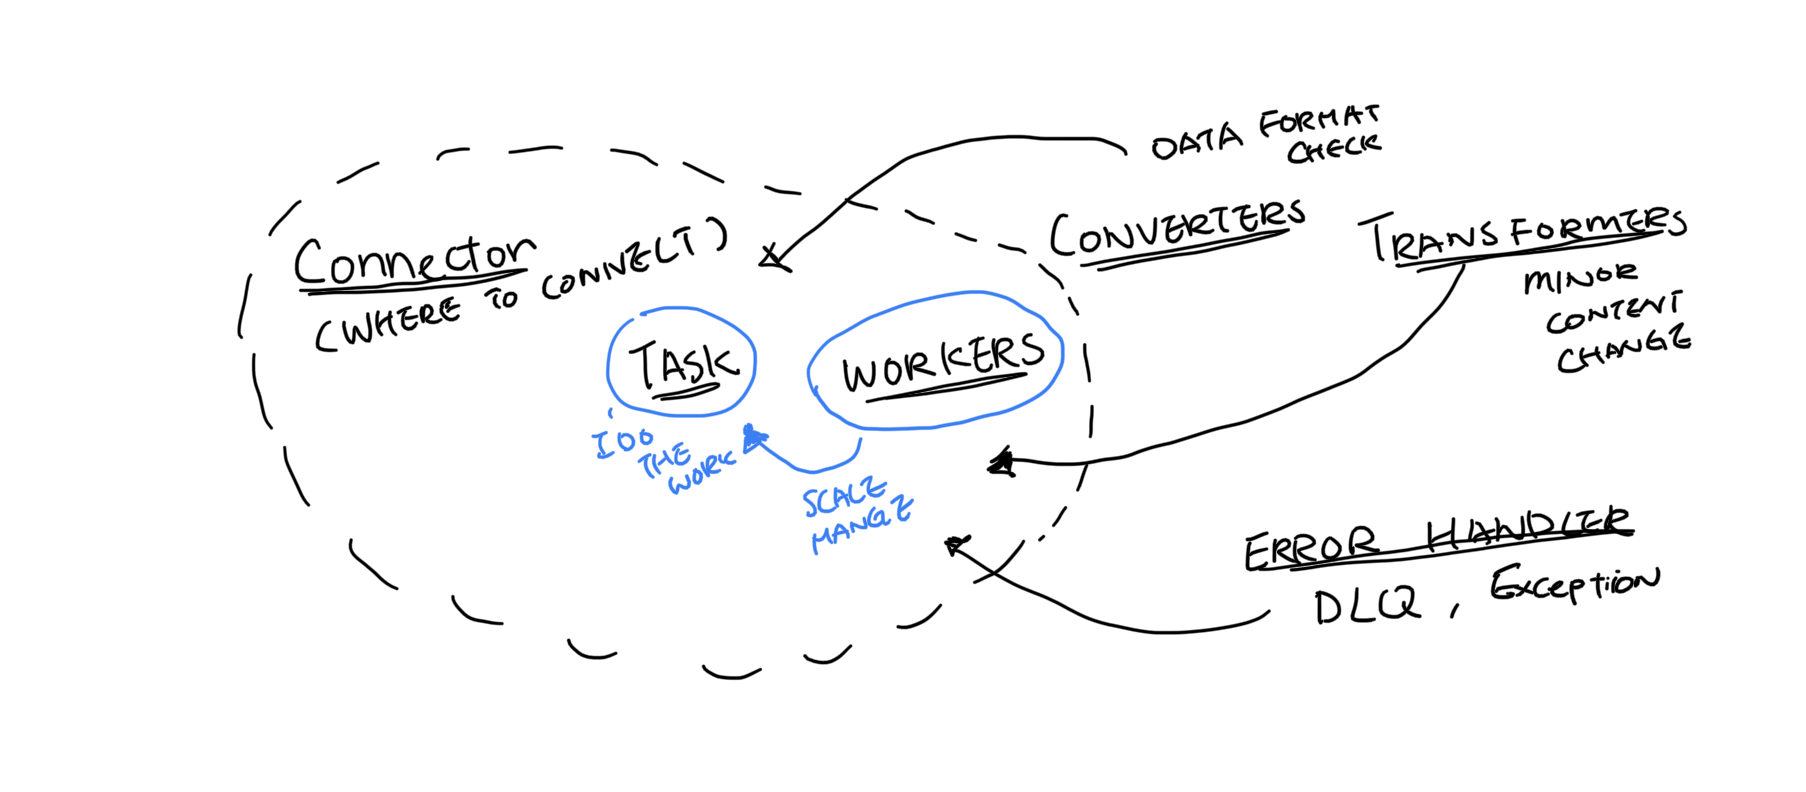
Kafka Connect is what the majority of the Kafka users are using today. It has been broken down into many parts such as connector, tasks, worker, converter, transformer and error handler. You can view the task and worker as how the data flow is executed. For a developer they will be mostly configuring the rest 4 pieces.
Connector - Describes the kind of source or the sink of the data flow, translating between the client/Kafka protocol, and knowing the libraries needed.
Converter - Converts the binary to the data format accepted by the client or vice versa (Currently there is limited support from Confluent, they only do data format) And does data format validation.
Transformer - Reads into the data format, can help make simple changes to individual data chunks. Normally you would do filtering, masking or any minor changes. ( This does not support simple calculations)
Error Handler - Define a place to store problematic data (Confluent : Dead letter queues are only applicable for sink connectors.)
After configuring, it then uses Task and Worker to determine how to scale and execute that pipe data in/out of Kaka. For instance, running a cluster of works to scale and allow tasks to perform parallel processing of streams.
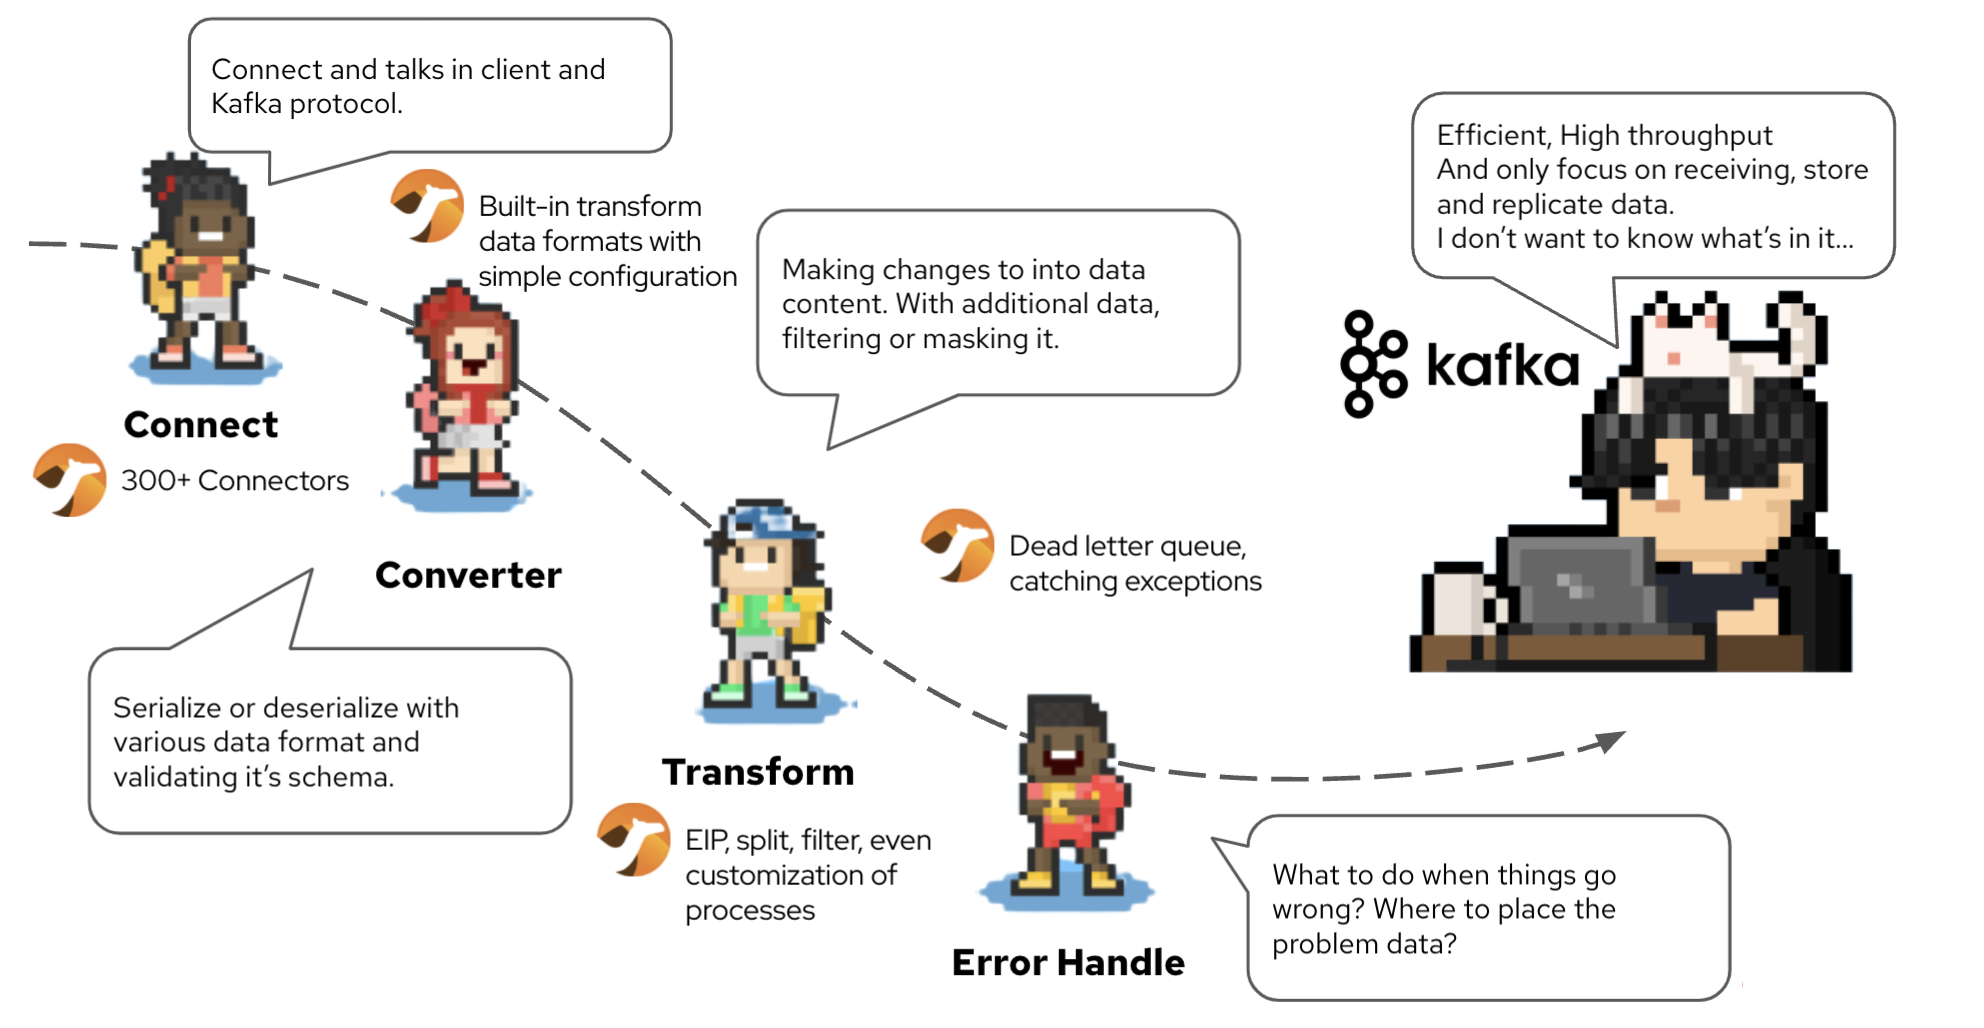
Camel is another great option!
Apache Camel is a GREAT alternative for connecting Kafka too. Here’s what Camel has to offer.
Connector - Camel has more than 300+ connectors, you can use it to configure as source or the sink of the data flow, translating between the 100+client/Kafka protocol.
Converter - Validate and transform data formats with simple configuration.
Transformer - Not only does simple message modification, it can apply integration patterns that are good for streaming processing, such as split, filter, even customization of processes.
Error Handler - Dead letter queue, catching exceptions.
There are also many ways to run Camel. You can have it running as a standalone single process that directly streams data in/out of Kafka . But Kamel works EXCEPTIONALLY well on Kubernetes. It run as a cluster of instances, that execute in parallel to maximize the performance. It can be deployed as native image through Quarkus to increase density and efficiency. The platform OpenShift (Kubernetes) allows users to control the scaling of the instance. Since it’s on K8s, another advantage is that operation can operate these as a unify platform, along with all other microservices.
Why Kamelet? (This is the way!)
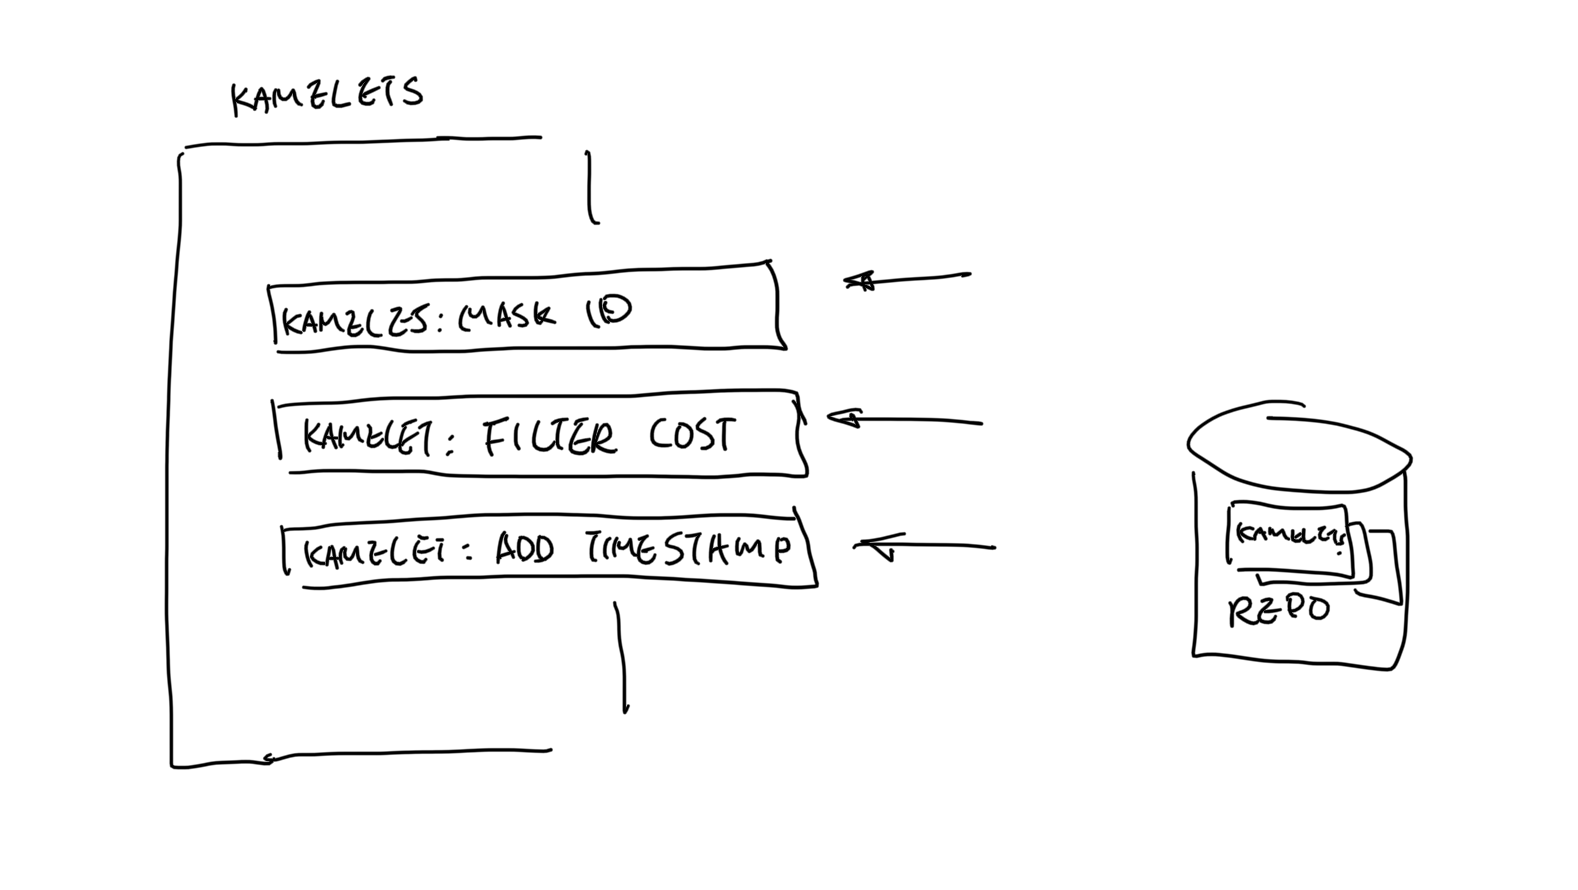
One of the biggest hurdles for non Camel developers is, they need to learn another framework, maybe another language (Non-Java) to be able to get Camel running. What if we can smooth the learning curve and make it simple for newcomers? We see a great number of use cases where the masking and filtering are implemented company wide. Being able to build a repository and reuse these logics will make developers work more efficiently.
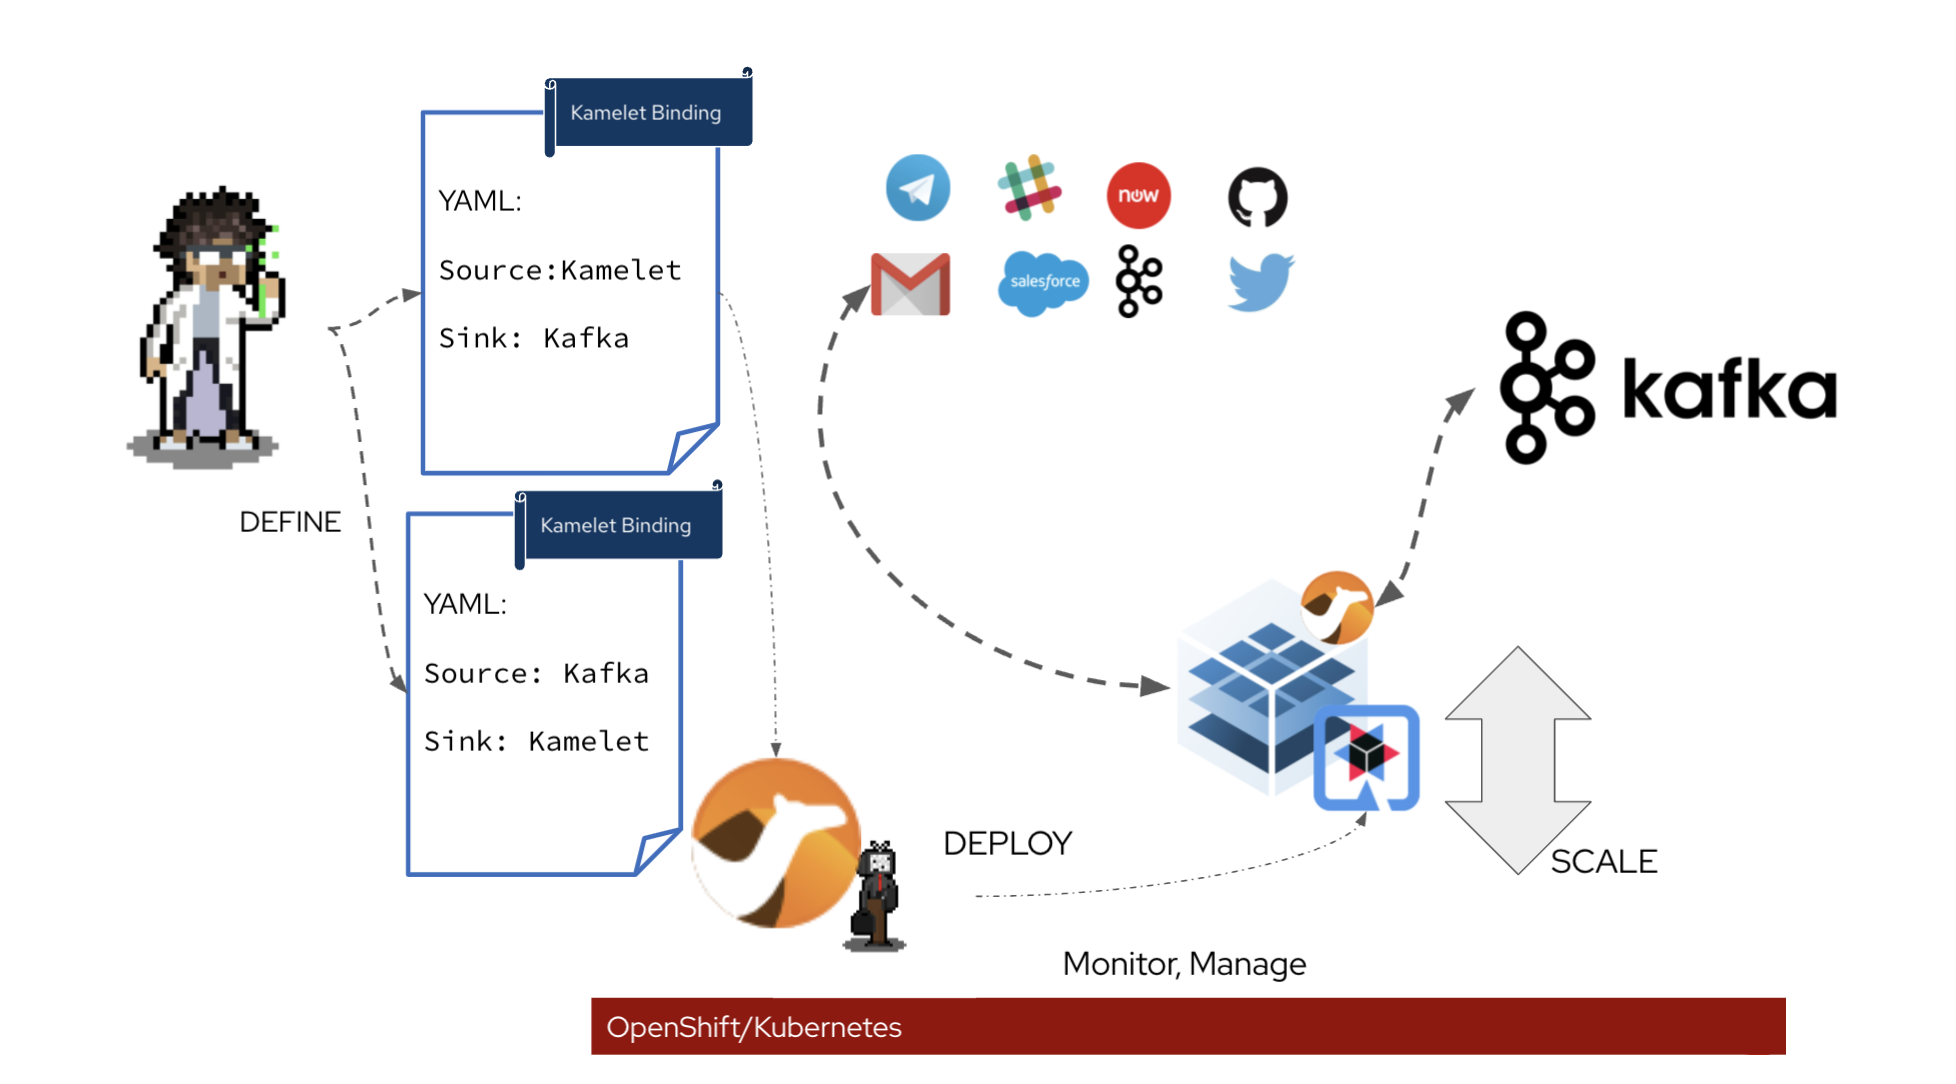
Plug & Play
You can look at Kamelets as templates, where you can define where to consume data from and send data to, does filtering, masking, simple calculation logic. Once the template is defined, it can be made available to the teams, that simply plugs it into the platform, configure for their needs (with either Kamelet Binding or another Camel route), and boom. The underlying Camel K will do the hard work for you, compile, build, package and deploy. You have a smart running data pipeline streams into Kafka.
Assemble & Reuse
In a data pipeline, sometimes, you just need that bit of extra work on the data. Instead of defining a single template for each case, you can also break it down into smaller tasks. And assemble these small tasks to perform in the pipeline for each use case. .
Streams & Serverless
Kamelets allows you to stream data to/from either Kafka store or Knative event channel/broker. To be able to support Knative, Kamelet can help translate messages to CloudEvents, which is the CNCF standard event format for serverless. And also apply any pre/post-processing of the content in the pipeline.
Scalable & Flexible
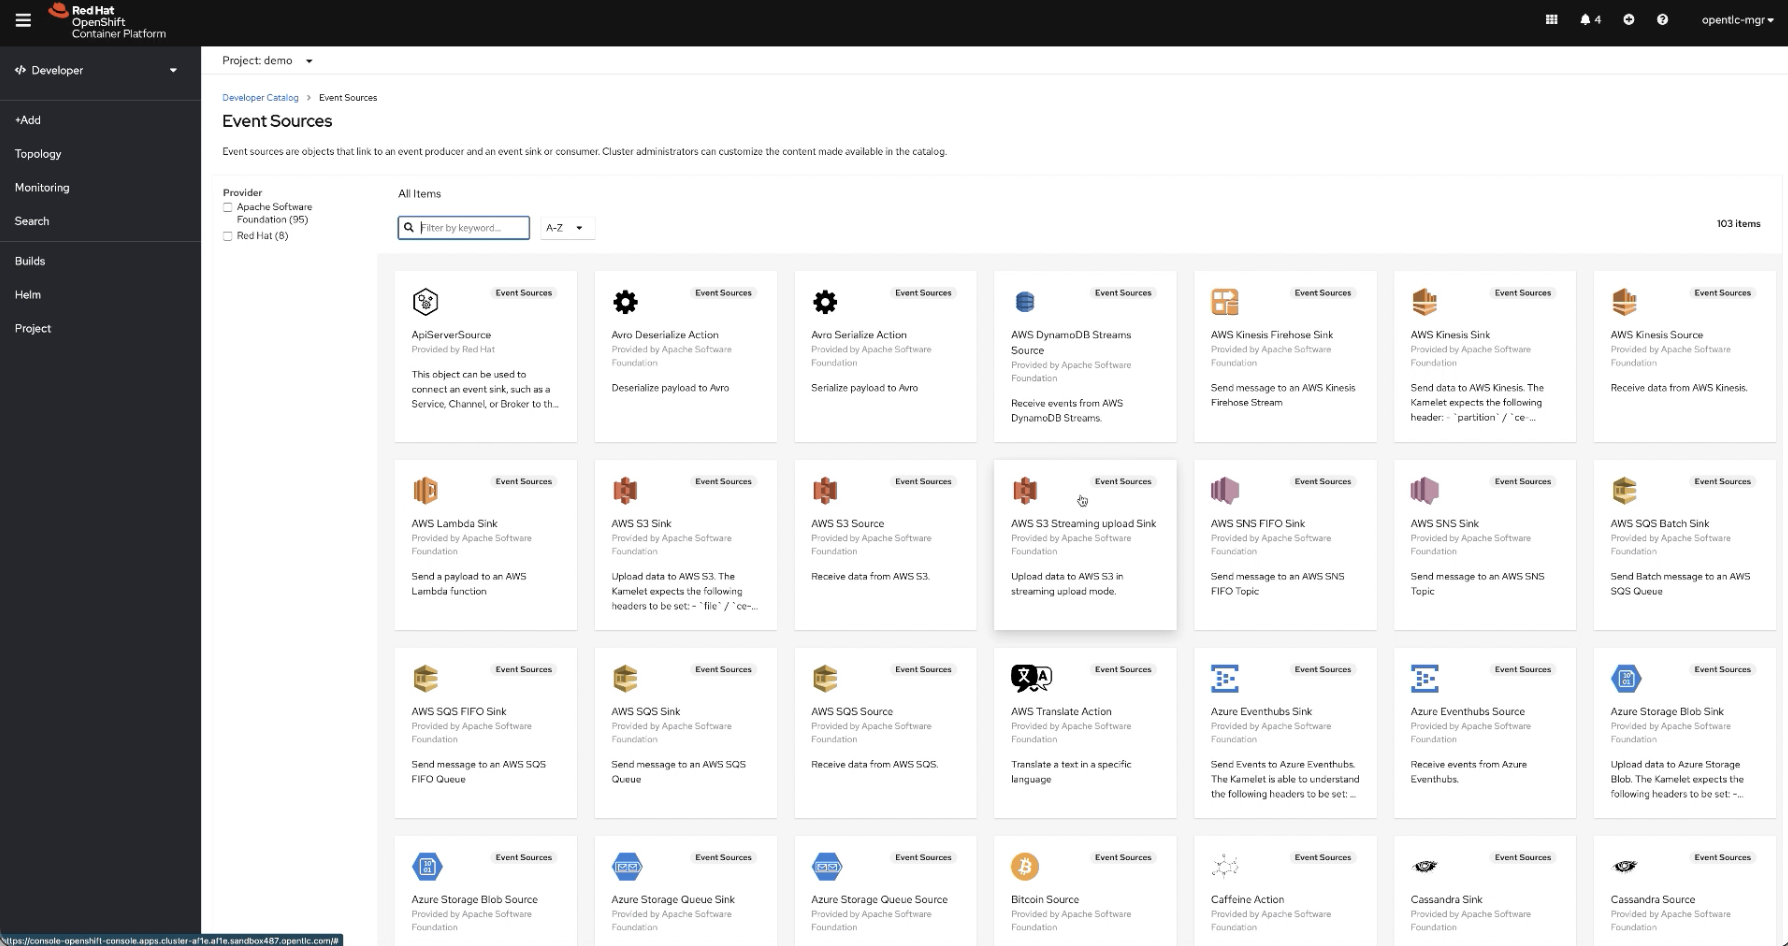
Kamelet lives on Kubernetes(can also run standalone), which gives you a comprehensive set of scaling tools, readiness, liveness check and scaling configuration. They are all part of the package. It scales by adding more instances. The UI on the OpenShift Developer Console can assist you to fill in what’s needed. And also auto discover the available source/sink for you to choose where the data pipelines start or end.
Unify for DEV & OPS
In many cases, DevOps engineers are often required to develop another set of automation tools for the deployment of connectors. Kamelet can run like other applications on kubernetes, the same tools can be used to build, deploy and monitor these pipelines. The streamline DEVOPS experience can help speed up the automation setup time.
Marketplace
List of catalogues that are already available (Not enough?). If you just want to stream data directly, simple pick the ones you need and start streaming. And we welcome your contributions too.
What to know more about Kamelet? Take a look at this video, where it talks about why using Kamelet for streaming data to Kafka with a demo.
Getting Started with Apache Camel ? This post is for you. But I am not going to dive into how to write the Camel route, there are plenty of materials out there that do a better job than me. A good place to get started is the one and only Camel Blog, it gives you all the latest and greatest news from the community. If you want to start from the basics, I highly recommend Camel in Action II Book. It has everything you need to know about writing Camel. Or join the Camel community mailing list or Zulip chat to ask questions, it's very friendly and welcoming.
If you are a returning Camel rider, I would go through this post, where it will get you up to speed on what to expect. Another good resource is the FAQ page. I found the majority of the getting started enquiries can be found here.
This post will be about tools that can help you, when it comes to running a Camel application in its lifetime. From design, implementation, testing, deployment and monitoring. Of course this is strictly my opinion. Any suggestions or comments are welcome.
Here is a quick collection of the tools I recommend.
Design & Implementation
There are several different IDEs out there that have language support for Camel. My current goto is the Visual Code Studio. VS Code itself has very primitive support for Java developers, but it comes with a large variety of extensions for you to customize it, and install all the tools you need. Speaking of extension, there is a must have… “Extension Pack for Apache Camel by Red Hat”. It contains the essentials for developing Camel. I recommend checking out the Aurélien Pupier youtube channel for updates!
To begin a project, it’s always good to have some help to set the basic structure. You can either use the Project Initializer that comes with the Apache Camel by Red Hat Extension in VS Code that will generate the base project for you. Or you can always go to the Quarkus start coding page, adding the Camel dependencies to create the base project, but one downside of the Quarkus start coding page, it will not create the template extended RouteBuilder class for you.
No matter what runtime you choose, you are still writing Camel DSL (Domain Specific Language), you have the latest and greatest support from the camel extension, where it will help you with autocomplete, validating your Camel code.
Mapping data between formats can be tedious, especially with larger documents or more complex structure. But using the
tooling can help you map between two data sources with a drag and drop user interface, so you will be able to visualize the mappings. The tool will generate an “.adm” file, place the file into your Camel project. You can then use the camel-atlasmap components to run the mapping.
from("servicenow:xxxxxx....")
.split().body()
.marshal().json()
.to("atlasmap:servicenow.adm")
.to("kafka:xxx?brokersxxx")
RESTful API is another popular implementation in Camel, I highly recommend you take advantage of the Apicurio project, where it provides a GUI interface for designing the API contract. Making contract first application development a lot easier. For more details, take a look at my previous blog.
Another nice complements to the toolset is the Camel Designer, this is another extension in VS Code by Bruno, this can help you visualize the design of camel processing flow. So you will be able to see what your camel route does in a quick glance.
Testing
Camel can easily wire up unit tests in your preferred testing framework. My past experience has been great with using JUnit for creating my test cases.
What I normally would do is create a java Class for each test case (Extend “CamelTestSupport” class). Where it can kick off your camel route with mock endpoints, loading set of data or even stub out the actual endpoint
When testing integration, introducing Behavior-Driven Development(BDD) Testing is a development practice, as it’s black box testing nature allows it to better mimic user input and expectation, and can test more complex scenarios when compared to Test-Driven Development(TDD). Consider using the “Citrus Testing Framework” for building out BDD test cases. You can define the test scenario descriptions with a "Given-When-Then" structure in a feature file, as well as a simple setup for mimicking the common endpoints such as Kafka, AMQP, JMS, REST… etc.
Feature: integration runs
Background:
Given load variables namespace.properties
Given URL: http://camel-hello-quarkus.${namespace}.svc.cluster.local:8080
Scenario: Checking GET Method
When send GET /prescription?profileid=123456
Then verify HTTP response body: {"profileid": 123456, "pharmancy": "CVS" }
Then receive HTTP 200 OK
I have also been using a spinoff project from Citrus called YAKs to do my BDD testing on Kubernetes(OpenShift) platform. And I LOVED it. Simply because 1st, the lifecycle of the test was managed by the YAKs operator, meaning the test was run on a separate instance, that is where the client supposed the call, and also the YAKs operator takes in the feature, and does the test based on it. You can run it separately or plug it into your CI/CD pipeline.
Platform
I have been using OpenShift(Kunerenets) for managing all the running instances. It's just easier when there are hundreds of Camels running, it manages the scaling, resources, configuration and load-balancing for me. As well as a better deployment module (images). There are so many articles out there talking about the benefits of running a container & container management, so I won’t dive into it.
CI/CD
Jenkin was on my list for a long time when it comes to building the pipeline for my Camel application. Basically using the maven jenkins plugin for compiling and deploying, and using the OpenShift plugin to do the canary releases. And recently, I have been using the Tekton pipeline, it’s built-in on OpenShift, so there is no need to install a separate instance and manage it. The Kubernetes platform itself will become the CI/CD platform itself. Here is an example of how it works with the Camel projects. I will write another deep dive into how it works.
Monitoring
With Camel 3, in order to collect and export the metrics, you will need to specifically add the microprofile-metrics dependency. And by using Prometheus to scrape metrics on the platform. It stores all scraped samples locally and aggregate the time series data. I then use Grafana to visualize the collected data, and create a dashboard to monitor all the camel routes.
Contract first application development is not limited to synchronized RESTFul API calls. With the adoption of event driven architecture, more developers are demanding a way to set up contracts between these asynchronous event publishers and consumers.. Sharing what data format that each subscriber is consuming, what data format is used from the event publisher, in a way OpenAPI standards is going to be very helpful.
But in the asynchronous world, it is ever more complex, not only do you need to be caring about the data schema, there are different protocols, serializing, deserializing mechanisms, and various support libraries. In fact there are talks on AsyncAPI. But I am going to show you that what can be done today, is to use ONE of the most commonly used solutions in building EDA, “Kafka”. And show how to do Contract First Application Development using Camel + Apicurio Registry.
The Solutions:
I will be using Red Hat’s version of Kafka, AMQ Streams, APIcurio as my service registry and finally using Apache Camel to build the contract first event driven application. . To spice things up I am going to be Avro and Protobuf. (Normally you want to choose between one of them.)
Rather than sending plain text like JSON or XML, binary representation is more compacted and efficient. And this works well with Kafka, since Kafka is using binary message format. In short, Avro and Protobuf are just ways to serialize/deserialize the data. Both also provide schema in order to serialize/deserialize data. And we can use it as the contract for each topic that is publishing/consuming the events.
Avro is from Hadoop, more commonly used in Kafka, as it’s default serialization.
Protobuf is from Google, has two versions, here I am using proto 3.
Apricurio Registry is a datastore for standard event schemas and API designs. We are going to use it for our Schema management. Where we will use it to store all the schemas, and use it’s client serializer/deserializer to validate the event messages.
Camel is the perfect framework for connecting the dots, transforming messages to desired states. As it provides built-in libraries to connect to Kafka, built-in data format transforms for Avro/Protobuf. (This is a great feature if you want to process the body, it simplifies and marshal the data into POJO.)
There are two different approaches to do this:
Manually upload schema, and using default Camel dataformat component to serialize/deserialize
Using the Apicurio Registry libraries to upload schema and serialize/deserialize
Environment
Here is what you need to have in the environment.
Kafka Cluster (AMQ Streams)
Apricurio Service Registry
Solution A Camel built-in Dataformat components: Steps in a glance, using Camel Quarkus.
You will have a sample Camel project ready to go. Add all the dependencies needed for the project. Depending on the endpoint you want to connect to, and add the dependencies into the pom.xml file under the project.
Add the dependencies you will need to convert between two serialize mechanisms, and place it into the Kafka topics.
<dependency>
<groupId>org.apache.camel</groupId>
<artifactId>camel-quarkus-protobuf</artifactId>
</dependency>
<dependency>
<groupId>org.apache.camel</groupId>
<artifactId>camel-quarkus-avro</artifactId>
</dependency>
<dependency>
<groupId>org.apache.camel</groupId>
<artifactId>camel-quarkus-kafka</artifactId>
</dependency>
<dependency>
<groupId>org.apache.camel</groupId>
<artifactId>camel-quarkus-stream</artifactId>
</dependency>
Add plugins to download the schema from registry. (Of course you can register a schema from local code too). But I am assuming there is a separate person that will design and handle schema management.
Note: In configuration, enter the location of the Registry. Also make sure you tell the plugin what schema to download and where to place it in the project.
Step Two
Create the schema. Login to your Apricurio Service Registry, upload the schema.
Setup the topics that you want to use to populate the events.
Add plugins to generate the POJO that we are going to be using for marshalling/unmarshalling. And it’s easier if we want to further process the data.
After adding the plugins, run the following command:
`` mvn compile ``
It will generate the corresponding java source base on the schema that was loaded from the registry.
Step Three
Add your Camel route in the MyRouteBuilder.java. Depending on what you want to do with the object.
For example, the code here demonstrates how to use the built-in Protobuf component, and transform to the Protobuf object. Before sending the data as Byte Array into the Kafka Topics.
Instead of manually uploading the schemas to the registry, we will be using the Apicurio Registry libraries, by adding it to the Kafka configuration, it will automatically save the schema in the registry.
Here is how it’s done,
Solution B - Apricurio Registry Libraries : Steps in a glance, using Camel Java Main.
Step One:
Create a Camel Project using the archetypes.
mvn archetype:generate \
-DarchetypeGroupId=org.apache.camel.archetypes \
-DarchetypeArtifactId=camel-archetype-java \
-DarchetypeVersion=3.5.0
Add the dependencies you will need to convert between two serialize mechanisms, and place it into the Kafka topics.
After adding the plugins, run the following command:
`` mvn compile ``
Step Three:
Add your Camel route in the MyRouteBuilder.java. Configure the Kafka component with the Apicurio registry libraries.
For example, the code here demonstrates how to serialize Avro and deserialize Protobuf with Apicurio registry libraries. And automatically register the schema in the registry. Note you need to point to the registry URL by providing the “apicurio.registry.url”.
And in the Camel route, instantiate the two generated Avro/Protobuf classes aldds, work normally with your camel integration logic, and simply send it to the Kafka endpoint that was configured on the previous step.
For example, this bean will create the ProtoBuf class and then sent to Kafka topics
You can find a working github example, in the link.That’s all for this post.
In my next post, I will walk you through the details of the example.
Summary
Here is a video that explain everything with diagrams (NO CODE)
Apricurio Registry is a datastore to help topic owners to manage the schema of it’s dat format. (API for Rest endpoints). When trying to publish/subscribe to the topic, developers will have access to the already defined schema contract. And using Apache Camel, to implement the actual integration code with simple configuration or built-in data format components.
Serverless should not be optional, but instead it should be there for all cloud native environments. Of course not all applications should adopt serverless. But if you look closer, the majority of the modules in the application are stateless, often stash away in the corner, that are needed occasionally. Some need to to handle loads that are highly fluctuated. These are the perfect candidates to run as serverless.
Serverless let developers focus on code instead of worrying about infrastructural setups. To provide this environment, along with proper monitoring and reliable backbone to handle large throughput of events.
This is what Serverless Integration (Kubernetes based) looks like,
Everything is based on containers. Why care about the underlying technologies for serverless ? Shouldn’t it all be transparent? If your goal is to host or build on a hybrid/multi cloud that is locked-in free from all vendors, it means there are NOT just developers involved in the picture. You will eventually need cooperation between teams and work with all sorts of applications such as traditional services and microservices. Having unification and standardization technology, will flatten the learning curve for teams to adopt new kinds of applications and make maintenance less complex.
From the development to the platform everything should seamlessly work together, and being able to automate and manage with ease.
Let’s break down all the elements.
The Platform: A Platform that provides full infrastructure and platform management with self service capability, service discovery and applying container policy and compliance.
The Serverless Platform: Handles autoscaling of the functions/application. Abstraction of the underlying infrastructure. Setup revision of the deployments for easy rollback. And unify events for the publishers and consumers.
The Event Mesh: Events are published to the mesh, and to the distributed consumers. The basic structure of the events are consistent and should be portable among platforms. All the events are flexible, governed and pushed quickly. Powered by a reliable streaming network, it helps to store the streams of event for tracing, auditing or later replay for big data processing/ AI/ML datasets.
The Integration Functions: Typical characteristics of serverless integration include, small, lightweight, stateless and event driven. These characteristics allow the application to be elastic, to tackle the under/over provisioning that we face today. From the operation side these are the applications that cease and quickly spin up after being triggered by events. For better resource optimization. And for developers it is a simple modular code snippet that they write and gets automatically spun up. So they can focus on code instead of deployment related issues. And Integration functions are the application that typically handles routing, transformation of data payload in events, and also other composing and orchestrating problems. Also commonly used for connecting to external services, and bridges between systems.
The microservice or the long running applications: These are the long running applications that contain states, heavier or that is always being called. Some of them will send events to the mesh to trigger serverless functions to initiate and start, or simply another consumer of the events.
The Service Registry: For sharing standard event schemas and API designs across API and event-driven architectures, either for events listening by serverless function or regular applications. Decoupling data structure and managing data types at runtime.
The API management: Gateway to secure and manage outgoing API endpoints. With access control and limits for the consumer, managing consoles and data analytics for access endpoints.
These are again, my two cents on the components that you need to have in order to deliver a complete serverless application environment.
Camel K, a project under the famous Apache Camel project. This project totally change the way developers work with Kubernetes/OpenShift cloud platforms. By automating the nasty configuration and loads of prep work from developers.
If you are an old time developer like me. I did my best slowly trying to adapt the latest and greatest cloud native “ecology”. It’s not difficult, but with small things and traps here and there. I’ll tell yel’ it's not a smooth ride. It’s understandable for emerging technologies. But with the large adoption of cloud, I see it’s reaching a level of maturity, where now we are thinking of how to make things go faster, as well as making it more accessible to the larger audience.
When a developer wants to publish their application onto a Kubernetes/OpenShift Platform, they need to first build the app. And containerized the app to have a working image. Then pushing the image to the platform to run. If the developer is trying to debug or develop the app with some changes, sorry, go back to square one and build it again. The worst nightmare for developers is the wait. It’s time consuming, and breaks the chain of thoughts. Camel K eliminates the painstaking process. Let developers quickly update apps they are building on the platform immediately. By layering the image build on cloud, and streaming the code efficiently with the Camel K operator.
Natively on cloud
Camel K is smart to discover the surrounding platform resources required to run on the platform. For instance, if a developer exposes a HTTP endpoint in the app, Camel K will know to create a related service and route in the platform. Another example is the cron jobs, where Camel K configures it for developers when it sees the behaviour in the code. Configurations are also taken care of for developers with Camel K convert the properties files into Kubernetes resources too. Reversing it is also simple. Simply remove the app, and Camel K will delete the related resource.
No more dependency hell
Dependency is troublesome, annoying things to a developer. It’s not a big deal in the monolithic world, it probably imported everything in the world already from prior projects. (Let’s not talk about the redundancy, wasted resource and version conflicts). When writing a 20 lines small microservice or function, it doesn’t make sense for a developer to write a 50 line dependency definition. Camel K will smartly pick up the dependencies needed to run the app, it will automatically locate the libraries when building. But also give developers the choice to load any specific libraries they need as well.
Freedom to choose the language and runtime
Camel K supports range of languages for developers, no matter if it’s Java or scripting languages like Groovy or Javascript to markup languageslike XML or YAML. Camel K no longer needs a big fat framework like Springboot to run. Depending on the types of application, developers can choose to run simple plain small Java Main in their microservice. Or go with the latest and greatest Quarkus with fast boot up time for serverless apps. Running the runtime requires literally just ONE configuration. “-t quarkus.enabled=true”
Simple, Small but Powerful
If we look closely at Camel K app, the core is from Apache Camel. This means developers will have well established patterns to reuse. Pre-built transformation for data and 300+ components available for quick connectivity. No more reinventing the wheel. So the code is cleaner, easier to maintain, but also maintains highly customizable freedom for users.
Serverless made easy
Reduce the operation, development and scaling cost. KNative is the most popular serverless frameworks on Kubernetes. It introduces the idea of scaling to zero, scaling up for load. And also serving the new specification for future Cloud Events. Applying these serverless capabilities to an app on the cloud requires a set of configuration. But with Camel K it will automatically do it and make it seamless for developer trying to access the channel to get the cloud events.
Check out this video I made a couple of months ago on Camel K. A 1000 feet high overview of what Camel K is. And also the getting started series I made for Camel K.
Lastly, choose the right tools for your projects. Camel K may not be a silver bullet that magically solves all your problems. But it’s definitely worth your time to see how dramatically it is going to change the way you code on Cloud platform!


Are you looking for a business loan, personal loans, mortgage loans, car loans, student loans, unsecured consolidation loans,project funding etc ... Or simply refuse loan from a bank or financial institution for one or more reasons? We are the right solutions for credit! We offer loans to businesses and individuals with low and affordable interest rate of 2%. So if you are Interested in an urgent and secured loan. For more information kindly email us today Via: elegantloanfirm@hotmail.com.
ReplyDelete